Setting up the build system
A case that is not handled very well by Makefiles is when you need to link to numerous external libraries. Let’s assume, you have downloaded VTK yourself to a custom directory and have built its libraries. In order to link to the library you need to tell the compiler where the library file and header files are located. An exemplary compile command could look like this:
g++ main.cpp -lvtk -L/software/vtk/lib -I/software/vtk/include -o test
The -l<library> flag specifies to search for and link to the libvtk.so library. The -L<path> option specifies the directory where libvtk.so is located. The -I<path> option specifies the include directory where all header files that come with the library are located. They can be included in the C++ code, e.g. as #include <vtkXMLImageDataWriter.h>.
In general, if the library was installed by the system, the -L and -I flags are not necessary as the locations will be found automatically. We need them only if the installation location is custom as in this case or the environment is special as on a supercomputer.
The above command is obviously not portable when the path is different on every computer. Also, it gets tedious for a high number of libraries. The solution is to not write Makefiles on your own, but to use cmake to do this task. cmake is another linux tool, as mentioned it creates Makefiles that then can be executed with make.
Example using Cmake
In the following example we will setup cmake to build a program that outputs files that can be visualized using ParaView. This will serve as basis for the code for the first submission.
Creating the source
At first, we take a look at the directory structure. Inside your preferred workspace directory, create two folders:
src where we’ll put all source code and header files
build where the executable will be created, as well as all program input and output and the byproducts of the build process.
In src create a subdirectory output_writer. In this directory, save the files write_paraview_output.h and write_paraview_output.cpp.
The header file, write_paraview_output.h, has the following content:
//! Write a file out/output_<fileNo>.vti to be visualized in ParaView.
//! It contains 10x10 nodes with an artifical pressure field.
//! This method is only for demonstration purpose and does nothing useful.
//! However, we will provide similar files, e.g. "output_writer_paraview.h", to be used in the submission code.
void writeParaviewOutput(int fileNo);
The source file, write_paraview_output.cpp should have the following content:
 1#include "output_writer/write_paraview_output.h"
 2
 3#include <vtkSmartPointer.h>
 4#include <vtkImageData.h>
 5#include <vtkXMLImageDataWriter.h>
 6#include <vtkDoubleArray.h>
 7#include <vtkPointData.h>
 8
 9#include <cstdlib>
10#include <iostream>
11
12void writeParaviewOutput(int fileNo)
13{
14  // create "out" subdirectory if it does not yet exist
15  int returnValue = system("mkdir -p out");
16  if (returnValue != 0)
17    std::cout << "Could not create subdirectory \"out\"." << std::endl;
18
19  // Create a vtkWriter
20  vtkSmartPointer<vtkXMLImageDataWriter> vtkWriter = vtkSmartPointer<vtkXMLImageDataWriter>::New();
21
22  // Assemble the filename
23  std::stringstream fileName;
24  fileName << "out/output_" << std::setw(4) << setfill('0') << fileNo << "." << vtkWriter->GetDefaultFileExtension();
25
26  std::cout << "Write file \"" << fileName.str() << "\"." << std::endl;
27
28  // assign the new file name to the output vtkWriter
29  vtkWriter->SetFileName(fileName.str().c_str());
30
31  // initialize data set that will be output to the file
32  vtkSmartPointer<vtkImageData> dataSet = vtkSmartPointer<vtkImageData>::New();
33  dataSet->SetOrigin(0, 0, 0);
34
35  // set spacing of mesh
36  const double dx = 1;
37  const double dy = 1;
38  const double dz = 1;
39  dataSet->SetSpacing(dx, dy, dz);
40
41  // set number of points in each dimension, 1 cell in z direction
42  dataSet->SetDimensions(10, 10, 1);
43
44  // add pressure field variable
45  // ---------------------------
46  vtkSmartPointer<vtkDoubleArray> arrayPressure = vtkDoubleArray::New();
47
48  // the pressure is a scalar which means the number of components is 1
49  arrayPressure->SetNumberOfComponents(1);
50
51  // Set the number of pressure values and allocate memory for it. We already know the number, it has to be the same as there are nodes in the mesh.
52  arrayPressure->SetNumberOfTuples(dataSet->GetNumberOfPoints());
53
54  arrayPressure->SetName("pressure");
55
56  // loop over the nodes of the mesh and assign an artifical value that changes with fileNo
57  for (int j = 0; j < 10; j++)
58  {
59    for (int i = 0; i < 10; i++)
60    {
61      int index = j*10 + i;
62      arrayPressure->SetValue(index, i+j-fileNo*(i-j));
63    }
64  }
65
66  // Add the field variable to the data set
67  dataSet->GetPointData()->AddArray(arrayPressure);
68
69  // Remove unused memory
70  dataSet->Squeeze();
71
72  // Write the data
73  vtkWriter->SetInputData(dataSet);
74
75  //vtkWriter->SetDataModeToAscii();     // comment this in to get ascii text files: those can be checked in an editor
76  vtkWriter->SetDataModeToBinary();      // set file mode to binary files: smaller file sizes
77
78  // finally write out the data
79  vtkWriter->Write();
80}
Note in line 1, how the header file is included. In our setup, the path will always be relative to the src directory. In lines 3-7, headers of the library VTK are included. This means, we have to properly tell the compiler to use the VTK library. Skim through the rest of the code to see approximately what will happen.
Next, we need a main.cpp file. We put it directly in the src folder, having the following content:
 1#include "output_writer/write_paraview_output.h"
 2
 3#include <iostream>
 4#include <cstdlib>
 5
 6int main(int argc, char *argv[])
 7{
 8  // write 5 output files
 9  for (int i = 0; i < 5; i++)
10  {
11    writeParaviewOutput(i);
12  }
13
14  return EXIT_SUCCESS;
15}
Creating CMakeLists.txt
In order to compile and link everything, we create a file to specify for cmake what we want to have. Create the file CMakeLists.txt in the src directory. Insert the lines that will be presented in the following blocks (with an empty line between the blocks, for readability):
1cmake_minimum_required(VERSION 3.8)
2
3# Define the project name.
4project(numsim)
Here, we require that at least the given version of cmake is used. You can check your installed version of cmake by running
cmake --version
Then, line 4 defines the name of our project. Next, we specify that we want to build an executable program, as opposed to a library.
All our source files (*.cpp) have to be listed. The macro ${PROJECT_NAME} is equal to numsim in our case and will be the name of the binary to build.
 6# Specify the name of the executable (${PROJECT_NAME} which is equal to what was set in the project() command).
 7# Also specify the source files.
 8add_executable(${PROJECT_NAME}
 9   main.cpp
10   output_writer/write_paraview_output.cpp
11)
Next, we specify the src directory as base directory for our #include “file.h” directives in the code:
13# Add the project directory to include directories, to be able to include all project header files from anywhere
14target_include_directories(${PROJECT_NAME} PUBLIC ${PROJECT_SOURCE_DIR})
The next section handles the inclusion of the external library VTK. The simple command in line 17 searches for VTK on the system and sets cmake variables some of which are printed in lines 20-22. Lines 25-28 add the required include directories and linker commands if VTK was found.
16# Search for the external package "VTK"
17find_package(VTK)
18
19# Output various cmake variables for demonstration purpose
20message("If VTK was found on the system: VTK_FOUND: ${VTK_FOUND}")
21message("The directory of VTK: VTK_DIR: ${VTK_DIR}")
22message("The include directory of VTK: VTK_INCLUDE_DIRS: ${VTK_INCLUDE_DIRS}")
23
24# If an installation of vtk was found on the system
25if (VTK_FOUND)
26  include_directories(${VTK_INCLUDE_DIRS})               # add the include directory where the header files are for the compiler
27  target_link_libraries(${PROJECT_NAME} ${VTK_LIBRARIES}) # add the libraries for the linker
28endif(VTK_FOUND)
By default, the executable numsim will be created in the directory build/src because the sources are also located in a src subdirectory. But we’d like to have it directly in the build directory. To copy build/src/numsim to build/numsim, we define an install rule with the following lines. It will be executed if we run make install.
30# install numsim executable in build directory
31install(TARGETS ${PROJECT_NAME} RUNTIME DESTINATION ${PROJECT_SOURCE_DIR}/../build)
The CMakeLists.txt file closes with various other options:
33# Add additonial compile options to enable more warnings
34add_compile_options(-Wall -Wextra)
35
36# Set the version of the C++ standard to use, we use C++14, published in 2014
37set(CMAKE_CXX_STANDARD 14)
38set(CMAKE_CXX_STANDARD_REQUIRED ON)
39
40message("CMAKE_BUILD_TYPE: ${CMAKE_BUILD_TYPE}")
Now, move up one directory to your workspace in which src and build are located. Create a second CMakeLists.txt file here, with only the following two lines:
1cmake_minimum_required(VERSION 3.8)
2add_subdirectory(src)
Line 2 references the CMakeLists.txt file in src. If you later want to add, e.g. a documentation directory, where a website with documentation from your code is automatically build (using doxygen), simply add a add_subdirectory(documentation) statement and provide another CMakeLists.txt in documentation with the details.
Now, we’re done with the configuration of cmake in the src directory. For comparison, install the tool tree
sudo apt install tree
and run it from the workspace directory. The displayed directory tree should look like this:
$ tree
.
├── build
├── CMakeLists.txt
└── src
    ├── CMakeLists.txt
    ├── main.cpp
    └── output_writer
        ├── write_paraview_output.cpp
        └── write_paraview_output.h

3 directories, 5 files
Building
As already mentioned, building consists of invoking cmake followed by make. In the build directory, run
cmake ..
The two dots .. specify the parent directory where the CMakeLists.txt file is located.
CMake will look for VTK and generate the Makefile on success. If there is an error finding VTK, maybe it is not yet installed? (sudo apt install libvtk7-dev libvtk7.1) If it still doesn’t work, you can download and install VTK on your own, paste the following into a terminal and wait for completion:
mkdir -p ~/software && cd ~/software            # create software directory in home
wget https://www.vtk.org/files/release/8.2/VTK-8.2.0.tar.gz  # download source archive
tar xf VTK-8.2.0.tar.gz && cd VTK-8.2.0         # extract files and enter directory
mkdir build && cd build                         # create build directory
cmake .. && make                                # build
sudo make install                               # install (needs password)
If cmake succeeds, it should say – Build files have been written to: … at the end. Now execute make:
$ make
Scanning dependencies of target numsim
[ 33%] Building CXX object src/CMakeFiles/numsim.dir/main.cpp.o
[ 66%] Building CXX object src/CMakeFiles/numsim.dir/output_writer/write_paraview_output.cpp.o
[100%] Linking CXX executable numsim
[100%] Built target numsim
Install the project...
-- Install configuration: ""
-- Installing: /store/wiss/2019/12_numsim/exercises/exercise1/resources/cmake_test/src/../build/numsim
-- Set runtime path of "/store/wiss/2019/12_numsim/exercises/exercise1/resources/cmake_test/src/../build/numsim" to ""
As you can see, the two steps of building and linking were performed separately, contrary to what we had in the previous examples. If you inspect the build directory now with the command tree, you’ll see that cmake produced a lot of temporary files. Among these we find our executable: src/numsim. It was also copied from the src subdirectory to ./numsim as we requested. Now run it, to see the program in action:
$ ./numsim
Write file "out/output_0000.vti".
Write file "out/output_0001.vti".
Write file "out/output_0002.vti".
Write file "out/output_0003.vti".
Write file "out/output_0004.vti".
You can always delete and recreate the build folder. No important information will be lost. When running cmake .. and make install again the executable will be build again.
The cmake command is necessary only once as long as nothing changed in the CMakeLists.txt files. After you have made changes to the C++ source files, run make install again. Only the compilation units where something has changed will be recompiled. This speeds up the building process if you have a lot of source files and want to rebuild after changing only a small number of files. Now, try running make install another time. If nothing has changed, no compilation will be done and cmake should something with “Up-to-date”.
CMake itself stores its various settings in cmake variables. The current values are stored in build/CMakeCache.txt. For example, the variable CMAKE_BUILD_TYPE controls if the debug or release target should be build. You can change values of cmake variables by running cmake -D<variable>=<value> .. To configure the release target, run (in the build directory):
cmake -DCMAKE_BUILD_TYPE=Release .
This time, cmake can be given the current directory “.” instead of “..”, because the cached variables exist already. However, “..” would have the same effect.
If you run make install again, everything will be recompiled, this time in release mode. To get back to debug mode, execute cmake -DCMAKE_BUILD_TYPE=Debug . You can clean the previous build with make clean.
It is also interesting to see the actual compile commands of GCC that we were saved from writing. After make clean, execute
make VERBOSE=1
Note how many shared objects (*.so) from vtk get linked into the program.
To summarize, we used cmake to generate a Makefile that we executed with make. This executed the g++ compile commands.
Viewing the result
After executing the built binary ./numsim, a directory out has been created with five output files. Now, visualize them with paraview as shown in Fig. 2 - Fig. 5.
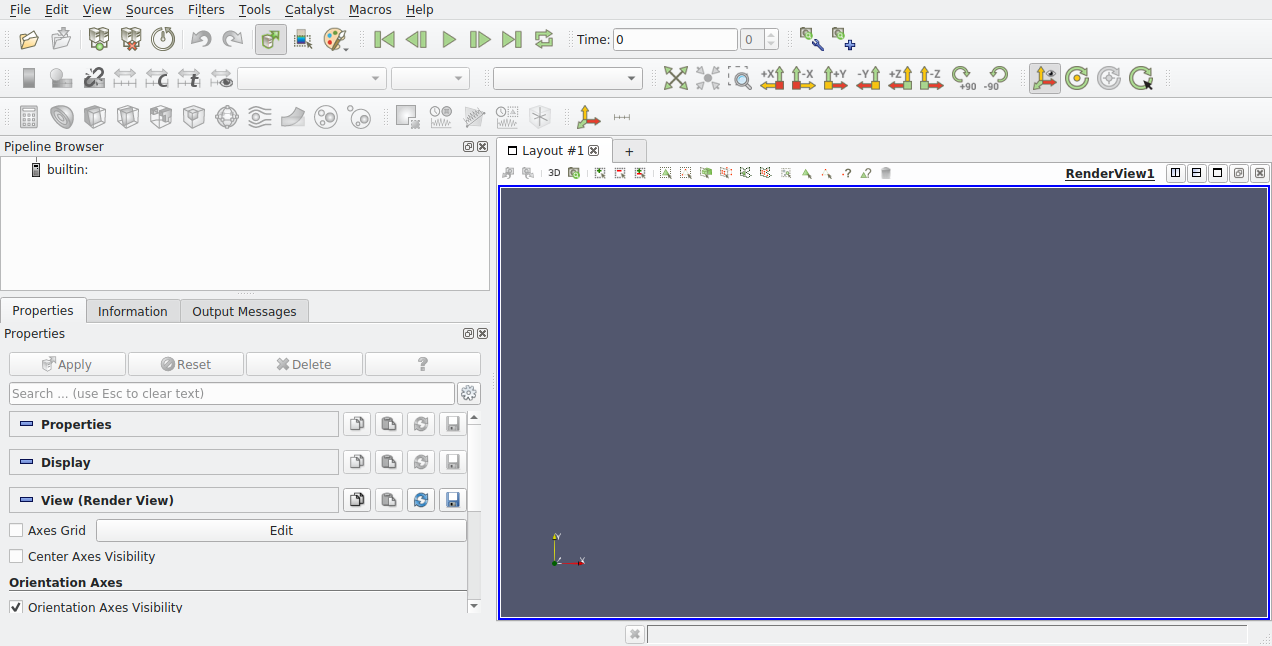
Fig. 2 Click on the yellow folder in the top left to open files.
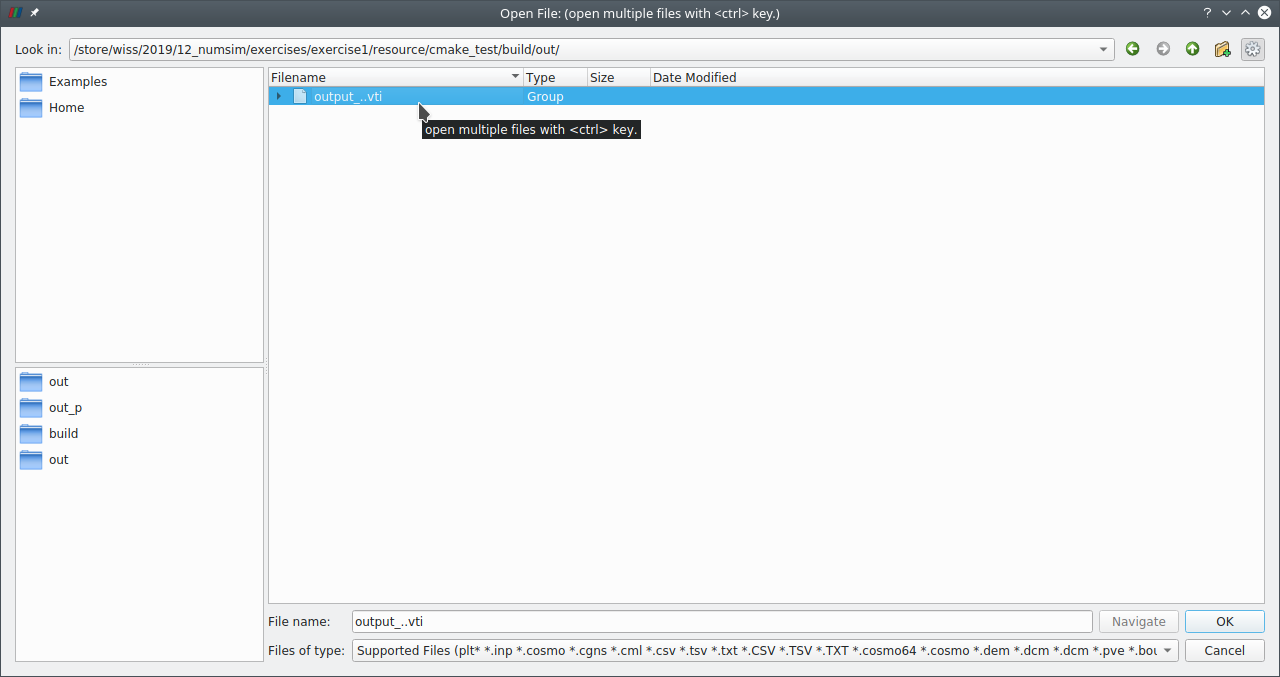
Fig. 3 Navigate to the “out” directory inside “build” and select the group of files.
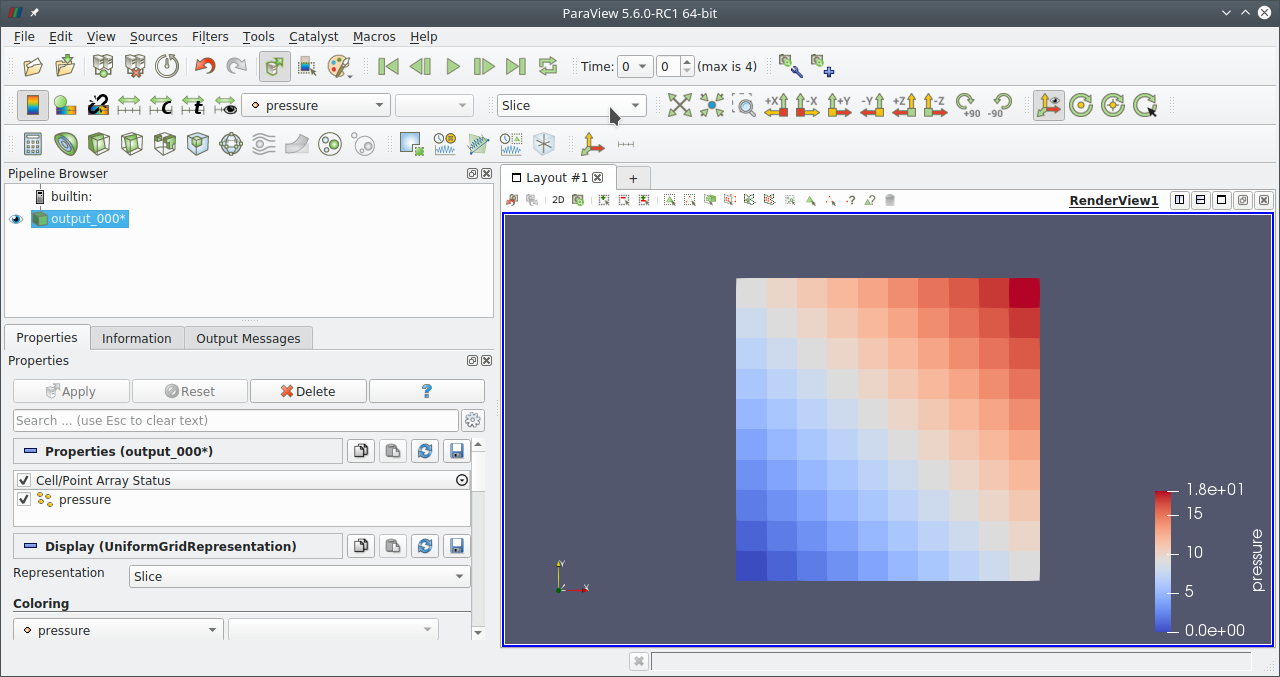
Fig. 4 Change the representation “Slice” to “Surface With Edges” to get an interpolated image.
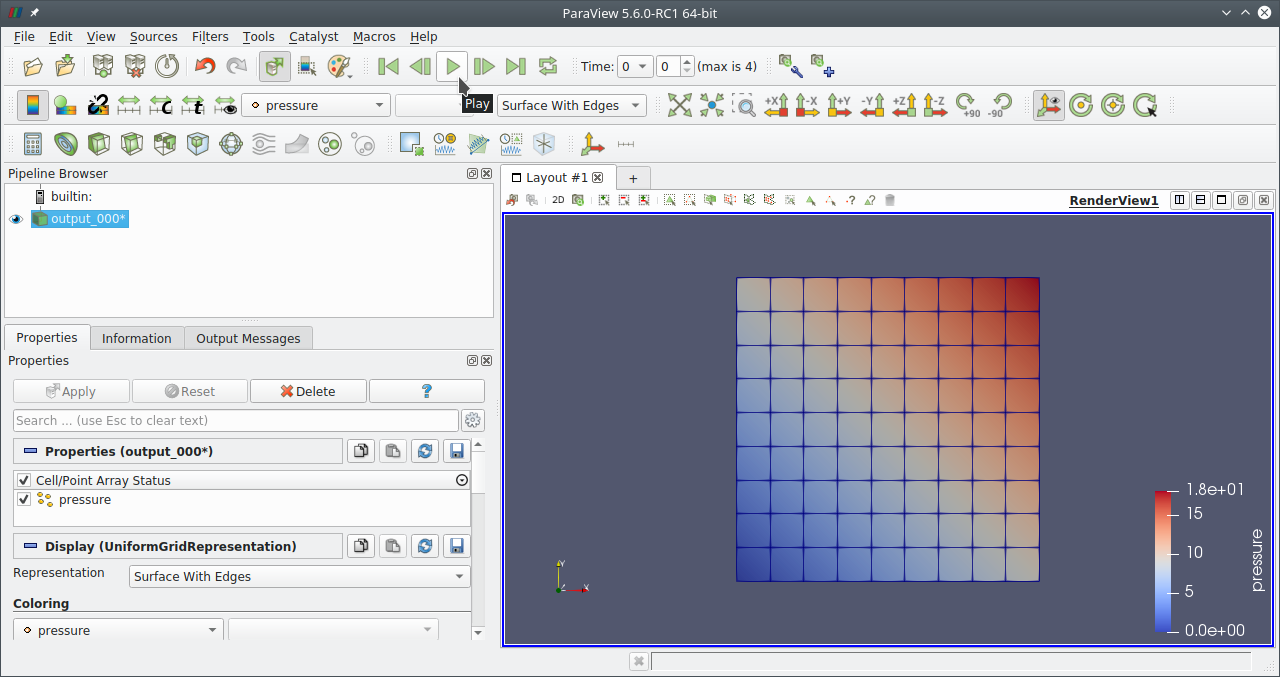
Fig. 5 Press Play or the neighbouring green buttons to navigate through all files.
Conclusion
Now, you have some experience using cmake. It is used by many open-source project (e.g. VTK). Most of them provide more options that can be set besides CMAKE_BUILD_TYPE. If the cmake -D<variable>=<value> mechanism is too inconvenient, you can try the graphical interfaces ccmake (works in the terminal) or cmake-gui (opens the graphical window in Fig. 6).
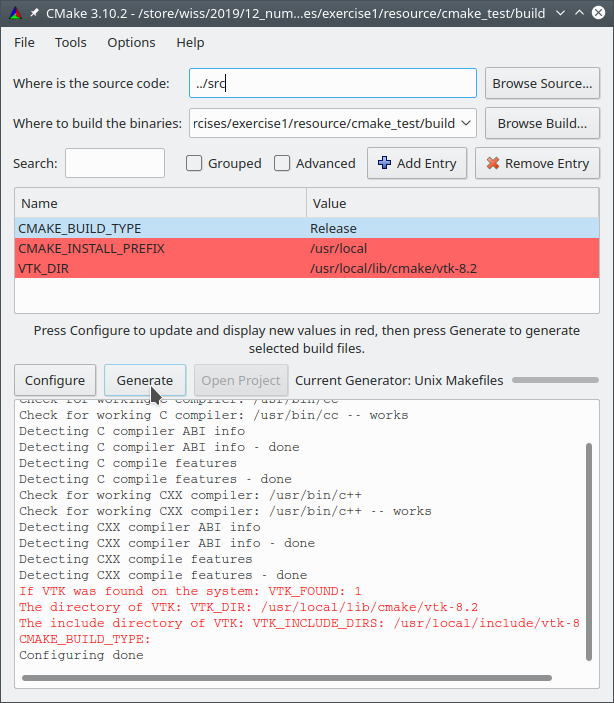
Fig. 6 Cmake-gui after filling in source and build directory and pressing “Configure”. Click “Generate” next to get the Makefile.
For the submission of exercise 1, keep the presented directory structure and work with cmake because only then the program can be automatically compiled and executed on the cluster during the submission process.